Let’s look at Wireshark’s user interface. Figure 3.1, “The Main window” shows Wireshark as you would usually see it after some packets are captured or loaded (how to do this will be described later).
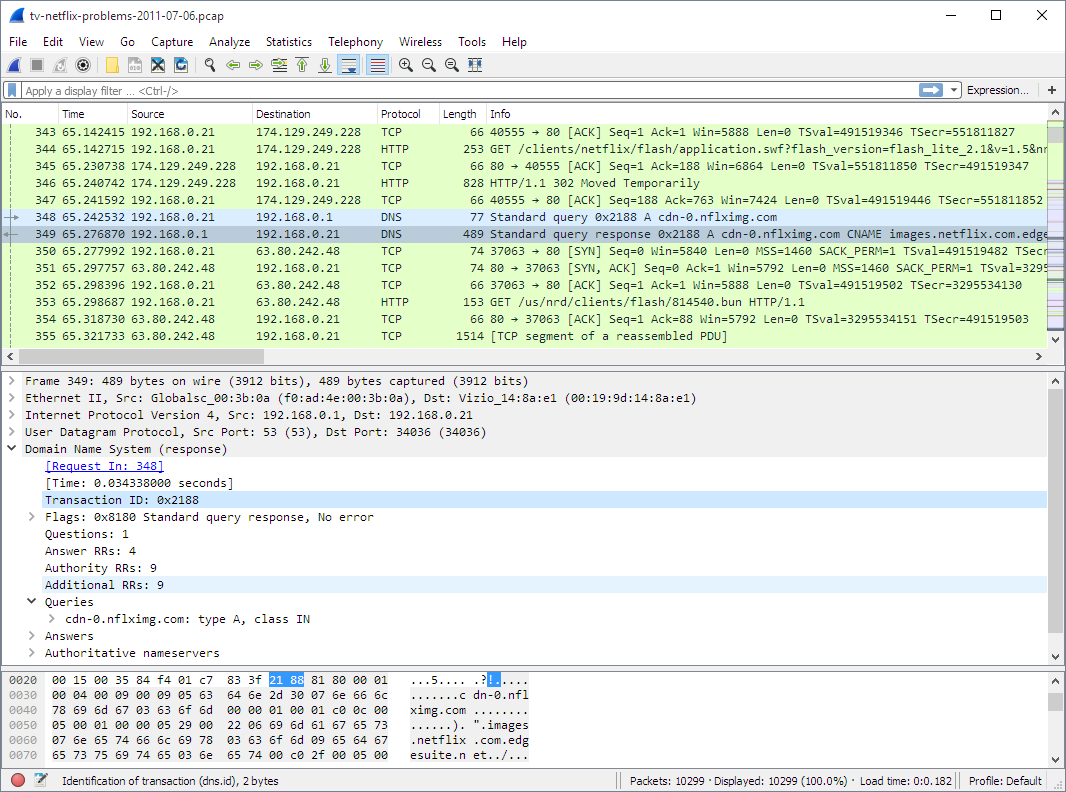
Wireshark’s main window consists of parts that are commonly known from many other GUI programs.
- The menu (see Section 3.4, “The Menu”) is used to start actions.
- The main toolbar (see Section 3.16, “The “Main” Toolbar”) provides quick access to frequently used items from the menu.
- The filter toolbar (see Section 3.17, “The “Filter” Toolbar”) allows users to set display filters to filter which packets are displayed (see Section 6.3, “Filtering Packets While Viewing”).
- The packet list pane (see Section 3.18, “The “Packet List” Pane”) displays a summary of each packet captured. By clicking on packets in this pane you control what is displayed in the other two panes.
- The packet details pane (see Section 3.19, “The “Packet Details” Pane”) displays the packet selected in the packet list pane in more detail.
- The packet bytes pane (see Section 3.20, “The “Packet Bytes” Pane”) displays the data from the packet selected in the packet list pane, and highlights the field selected in the packet details pane.
- The statusbar (see Section 3.21, “The Statusbar”) shows some detailed information about the current program state and the captured data.
![[Tip]](wsug_graphics/tip.svg) | Tip |
|---|---|
|
The layout of the main window can be customized by changing preference settings. See Section 11.5, “Preferences” for details. |
Packet list and detail navigation can be done entirely from the keyboard. Table 3.1, “Keyboard Navigation” shows a list of keystrokes that will let you quickly move around a capture file. See Table 3.6, “Go menu items” for additional navigation keystrokes.
Table 3.1. Keyboard Navigation
| Accelerator | Description |
|---|---|
Tab or Shift+Tab | Move between screen elements, e.g. from the toolbars to the packet list to the packet detail. |
↓ | Move to the next packet or detail item. |
↑ | Move to the previous packet or detail item. |
Ctrl+↓ or F8 | Move to the next packet, even if the packet list isn’t focused. |
Ctrl+↑ or F7 | Move to the previous packet, even if the packet list isn’t focused. |
Ctrl+. | Move to the next packet of the conversation (TCP, UDP or IP). |
Ctrl+, | Move to the previous packet of the conversation (TCP, UDP or IP). |
Alt+→ or Option+→ (macOS) | Move to the next packet in the selection history. |
Alt+← or Option+← (macOS) | Move to the previous packet in the selection history. |
← | In the packet detail, closes the selected tree item. If it’s already closed, jumps to the parent node. |
→ | In the packet detail, opens the selected tree item. |
Shift+→ | In the packet detail, opens the selected tree item and all of its subtrees. |
Ctrl+→ | In the packet detail, opens all tree items. |
Ctrl+← | In the packet detail, closes all tree items. |
Backspace | In the packet detail, jumps to the parent node. |
Return or Enter | In the packet detail, toggles the selected tree item. |
→ → will show a list of all shortcuts in the main window. Additionally, typing anywhere in the main window will start filling in a display filter.